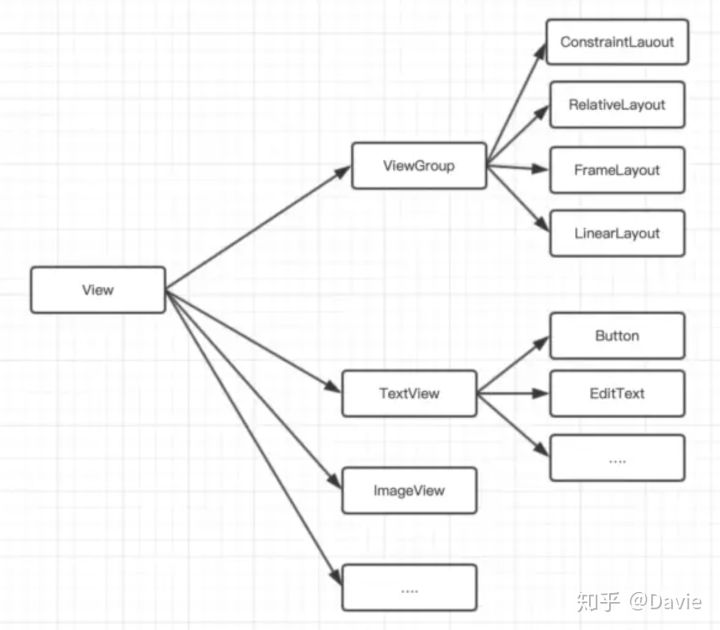
在Android中,无论是熟知的布局,还是控件,统统全都继承自基类View。

自定义View实现有几种:
View的绘制基本由measure()、layout()、draw()这个三个函数完成:
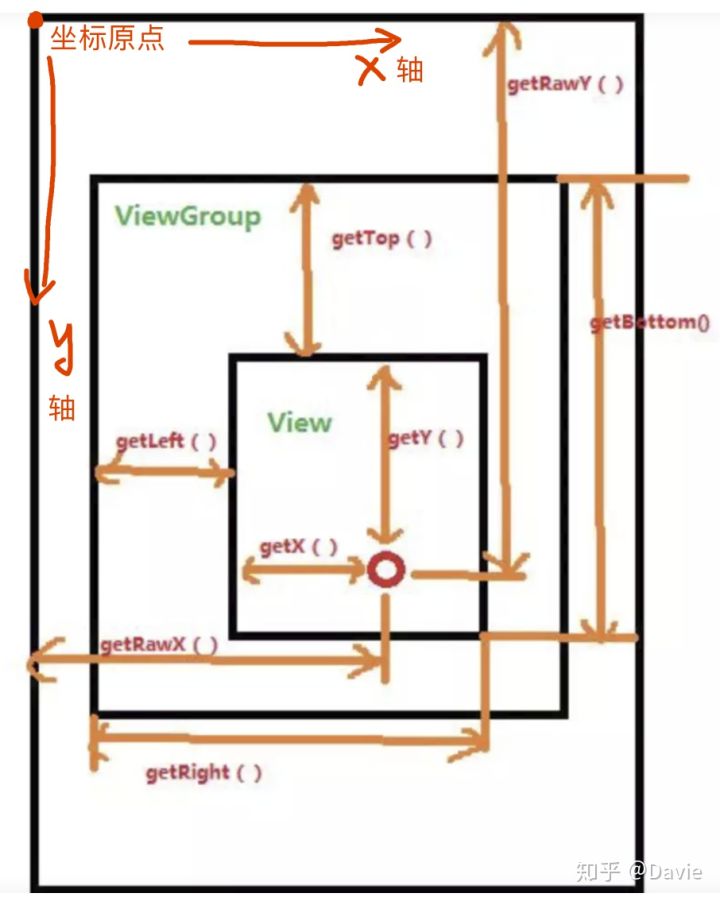
在Android坐标系中,以屏幕左上角作为原点,这个原点向右是X轴的正轴,向下是Y轴正轴。

根据以上的坐标,结合View基类的相关API,涉及View的一些坐标方法,比如:
结合以上的API,可以计算出视图的宽度和高度,可以使用如下方式计算:
这里我们介绍最复杂的一种,自定义View。
无论是继承系统View还是直接继承View,都需要对构造函数进行重写,构造函数有多个,至少要重写其中一个才行。
public class CustomView extends View{
  /**
  * 代码中New实例化时 调用该方法
  */
  public CustomView(Context context){
    super(context);
  }

  /**
  * 在xml布局文件中使用时会自动调用该方法
  */
  public CustomView(Context context, AttributeSet attrs){
    super(context, attrs);
  }
  ...
  //更多参数的构造函数
}Android系统的控件以android开头的都是系统自带的属性。为了方便配置自定义View的属性,我们也可以自定义属性值。Android自定义属性可分为以下几步:
attrs.xml文件示例如下:
<#xml version="1.0" encoding="utf-8"#>
<resources>
  <declare-styleable name="test">
    <attr name="text" format="string" />
    <attr name="testAttr" format="integer" />
  </declare-styleable>
</resources>
代码实现示例如下:
public class MyTextView extends View {
    private static final String TAG = MyTextView.class.getSimpleName();

    //在View的构造方法中通过TypedArray获取
    public MyTextView(Context context, AttributeSet attrs) {
        super(context, attrs);
        TypedArray ta = context.obtainStyledAttributes(attrs, R.styleable.test);
        String text = ta.getString(R.styleable.test_testAttr);
        int textAttr = ta.getInteger(R.styleable.test_text, -1);
        Log.e(TAG, "text = " + text + " , textAttr = " + textAttr);
        ta.recycle();
    }
}
布局文件使用示例如下:
<RelativeLayout xmlns:android="http://schemas.android.com/apk/res/android"
    xmlns:tools="http://schemas.android.com/tools"
    xmlns:app="http://schemas.android.com/apk/res/com.example.test"
    android:layout_width="match_parent"
    android:layout_height="match_parent" >
    <com.example.test.MyTextView
        android:layout_width="100dp"
        android:layout_height="200dp"
        app:testAttr="520"
        app:text="helloworld" />
</RelativeLayout>MeasureSpec是View的内部类,它封装了一个View的尺寸,在onMeasure()当中会根据这个MeasureSpec的值来确定View的宽高。MeasureSpec的值保存在一个int值当中。一个int值有32位,前两位表示模式mode后30位表示大小size。即MeasureSpec = mode + size。
在MeasureSpec当中一共存在三种mode:
常见的使用方式如下:
// 获取测量模式(Mode)
int specMode = MeasureSpec.getMode(measureSpec)
// 获取测量大小(Size)
int specSize = MeasureSpec.getSize(measureSpec)
// 通过Mode 和 Size 生成新的SpecMode
int measureSpec=MeasureSpec.makeMeasureSpec(size, mode);整个测量过程的入口位于View的measure方法当中,该方法做了一些参数的初始化之后调用了onMeasure方法,这里我们主要分析onMeasure。onMeasure源码如下:
protected void onMeasure(int widthMeasureSpec, int heightMeasureSpec) {
  setMeasuredDimension(getDefaultSize(getSuggestedMinimumWidth(), widthMeasureSpec),
                getDefaultSize(getSuggestedMinimumHeight(), heightMeasureSpec));
}layout()过程,对于View来说用来计算View的位置参数,对于ViewGroup来说,除了要测量自身位置,还需要测量子View的位置。layout()方法是整个Layout()流程的入口,并在layout方法中调用了onLayout方法,主要是进行子View的计算。
draw流程也就是的View绘制到屏幕上的过程,整个流程的入口在View的draw()方法之中,而源码注释也写的很明白,整个过程可以分为6个步骤:
自定义View在Android的开发中的重要性还是很大的,因为仅仅靠系统提供的控件和组件,无论是美观度还是使用度,再或者是新特性上,都无法满足特定的业务场景。因此,常常要用到自定义View,这就要求要在自己的项目自己完成特殊控件的自主开发。自定义控件在开发过程中也属于重点和难点,应该多花时间进行学习和研究,重点有以下几个: